Setting up Microsoft Visual Studio .NET
for OpenGL/GLUT and Free Image
Compiling and executing the examples
|
( 0 ) Download and Install GLUT & FreeImage for Windows |
| You must first download the GLUT for Windows library. FreeImage can be downloaded for Windows at : Free Image for
Win32 Install Glut into the following directories: glut32.dll -> C:\Windows\System or
C:\WinNT\System Unpack FreeImage. You
will see a directory called Dist (distribution). These files
should be installed into the following locations. (note the different location for
freeImage.h) freeImage.dll -> C:\Windows\System or
C:\WinNT\System Note: |
|
( 1 ) Open a New Project |
| First open Microsoft Visual Studio .NET if you have not
already done so.
|
|
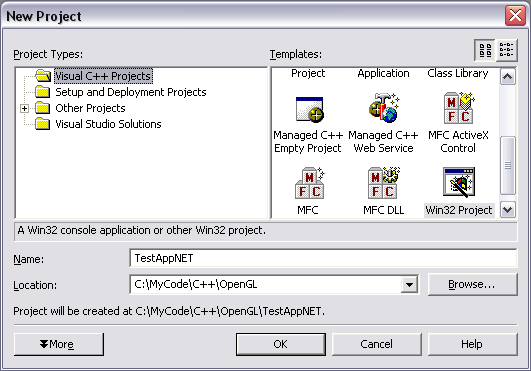
( 2 ) Create a New Win32 Project |
| On the left side under Project Types click: Visual
C++ Projects |
|
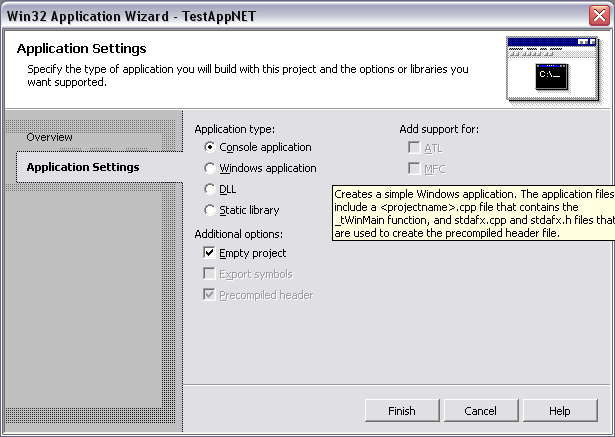
( 3 ) Create a New Console Application |
| In order to create an empty console application
(standard for using OpenGL/GLUT) you need to click on Application
Settings on the left side of the dialog.
|
|
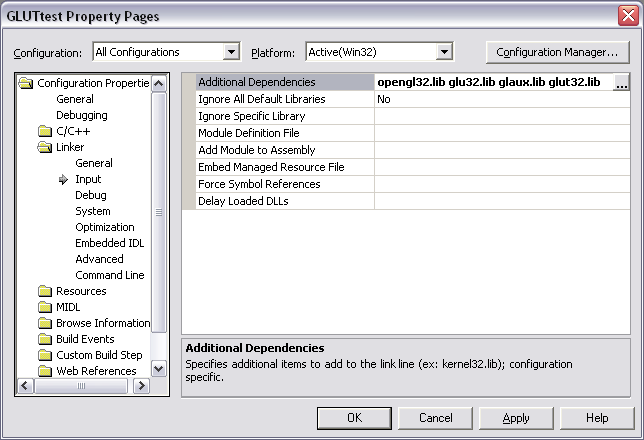
( 4 ) Linking OpenGL and GLUT |
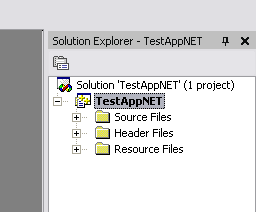
| You should now be facing a blank project. Somewhere
within Visual Studio should be the Solution Explorer (It is
docked on the right side at the top by default).
Now right click on the project (called TestAppNET here)
and click Properties.
|
|
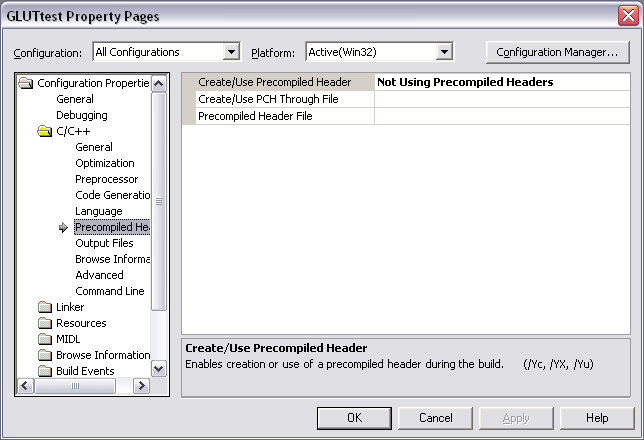
( 5 ) Turning off Precompiled Headers |
| Precompiled Headers play havoc with OpenGL and other
libraries such as STL. When you try to compile a number of strange
errors occur duing the linking phase. Turning off precompiled headers
solved this problem.
|
|
( 6 ) Creating a basic OpenGL/GLUT program |
| We now need a source code (.c or .cpp) file to put our
code into. To do this right click on the Source Files
folder under project in the Solution Explorer. If this is not
visible click the small + to the left of the project name. In the right
click menu click Add -> Add New Item.... A new
dialog will open. Click Visual C++ on the left side
then click C++ File (.cpp) on the right side. #include <windows.h> Save the file now by clicking File -> Save filename
or by pressing Ctrl + S. Then run it by clicking Debug
-> Run without Debugging or by pressing Ctrl + F5.
Visual Studio should ask you if you want to compile the project so
click Yes. An OpenGL/GLUT window should now appear
with a wireframe box rotating. Press the Q key to
quit the program. |
|
(7 ) Creating a freeImage program. |
We now need a second source code (.c or .cpp) file to
put our FreeImage code into. To do this right click on the Source
Files folder under project in the Solution Explorer.
If this is not visible click the small + to the left of the project
name. In the right click menu click Add -> Add New Item....
A new dialogue will open. Click Visual C++ on the
left side then click C++ File (.cpp) on the right
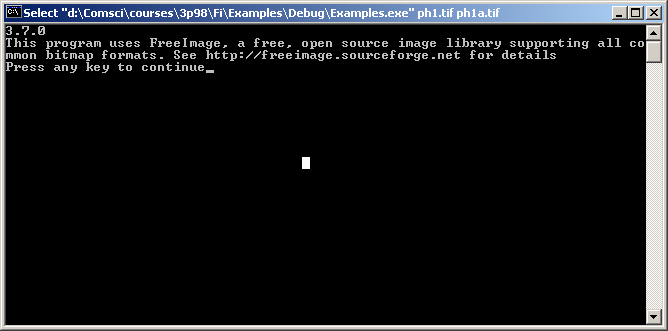
side. Copy the following code into the new file. This is a slightly modified version of the "LoadFromHandle.cpp" program supplied with free image. The program should open a text window stating the version etc. If it can load in a graphics file, then you should see the following.
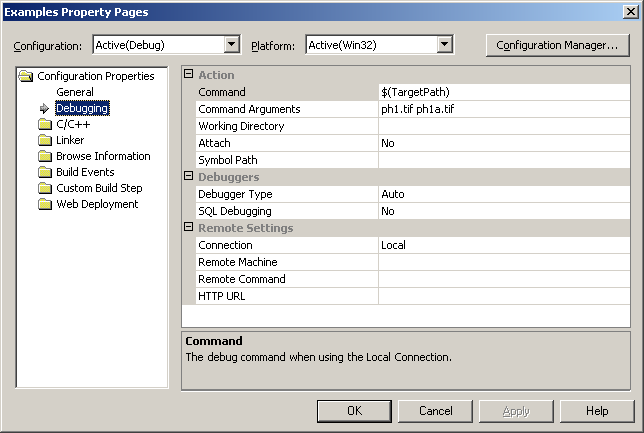
You will need
to specify the input file on the command line. Open the project
properties window and select debugging. Under Command Arguments
list any command line arguments your program is to accept. These are
read and made available to the program via the *argv[] strings. See below.
Here's an image used by the example: spit06.tif
#include "FreeImage.h"

typedef struct {
	int r, g, b;
} pixel;

pixel **read_img(char *name, int *width, int *height) {
	FIBITMAP *image;
	int i,j;
	RGBQUAD aPixel;
	pixel **data;

	if((image = FreeImage_Load(FIF_TIFF, name, 0)) == NULL) {
		perror("FreeImage_Load");
		return NULL;
	}

	*width = FreeImage_GetWidth(image);
	*height = FreeImage_GetHeight(image);

	data = (pixel **)malloc((*height)*sizeof(pixel *));
	for(i = 0 ; i < (*height) ; i++) {
		data[i] = (pixel *)malloc((*width)*sizeof(pixel));
		for(j = 0 ; j < (*width) ; j++) {
			FreeImage_GetPixelColor(image, j, i, &aPixel);

			data[i][j].r = (aPixel.rgbRed);
			data[i][j].g = (aPixel.rgbGreen);
			data[i][j].b = (aPixel.rgbBlue);
		}
	}

	FreeImage_Unload(image);
	return data;
}

void write_img(char *name, pixel **data, int width, int height) {
	FIBITMAP *image;
	RGBQUAD aPixel;
	int i,j;

	image = FreeImage_Allocate(width, height, 24, 0, 0, 0);

	if(!image) {
		perror("FreeImage_Allocate");
		return;
	}

	for(i = 0 ; i < height ; i++) {
		for(j = 0 ; j < width ; j++) {
			aPixel.rgbRed = data[i][j].r;
			aPixel.rgbGreen = data[i][j].g;
			aPixel.rgbBlue = data[i][j].b;

			FreeImage_SetPixelColor(image, j, i, &aPixel);
		}
	}

	if(!FreeImage_Save(FIF_TIFF, image, name, 0)) {
		perror("FreeImage_Save");
	}

	FreeImage_Unload(image);
}

int main() {
	pixel **data;
	int w, h;

	data = read_img("spit06.tif", &w, &h);
	write_img("backup.tif", data, w, h);

	return 0;
}
|
|
(8 ) Course Examples |
| There are 2 releases with working examples for
GLUT/FreeImage for Visual Studio (VS) and Linux. The same code has been
tested on each. Provided that VS and the Linux env. has been correctly
installed. For Windows: Download Win32Examples.zip, This file contains a VS
project by the same name. Extract the contents of this file to an
appropriate directory. Start VS and open the project file. To build a specific example:
1). Select the .c file, right click and open the properties
for that file. All other examples should be set to YES, VS will only
create one executable at a time using the given configuration. Note:
you can select all .c files, set them all to "Exclude from build", and
then include the one you are interested in. Follow the instructions given in the tutorial for compilation and execution. Be sure to set appropriate command line arguments. The file Examples.zip contains specific examples for
FreeImage. Only 1 example has been modified from the example suit
provided by FreeImage, that program is called "Example_read_mode_write.c".
This file should be compiled and executed. It gives a good example on
how to set up your own memory allocation, read an image into that
memory, modify the image and write it back out. It requires 2 command
line parameters. We have provided an input image example, ph1.tif
(Paris Hilton who else). Ensure you set the command line arguments to
include ph1.tif as the first parameter, the second can be anything you
want, include a valid suffix. The suffix determines the o/p file type. Problems have been encountered running the example
without debugging. It tends to fail when allocating from the Heap. If
it fails to run, just use start (F5). The error should go away. For Linux: The same zip file may be extracted under Linux.
Preprocessor statements have been added to ensure that the proper
include files and function calls are appropriate for Linux. To build the examples: One make file has been created to build all executables
for the provided examples. 1). From a terminal window
type make. Provided the installation matches that which the
'make' file was created for, you should see each example being compiled
and linked. Should your installation be different, the you will need to
edit the 'Makefile' to include the proper paths for your installation. 2). Execute the
example, ---- ./NameOfExe The Free image zip file can be extracted under Linux as
well. It has its own make file specific to building the "Example_read_mode_write.c"
example. Once again, the make file was created to reflect the lab
installation at Brock. |
© 2003 -- Adam Hewgill, 2005 D.Bockus