Setting up Microsoft Visual Studio .NET
for OpenGL/GLUT
|
( 0 ) Download and Install GLUT for Windows |
|
You must first download the GLUT for Windows library. |
|
( 1 ) Open a New Project |
|
First open Microsoft Visual Studio .NET if you have not already done so.
|
|
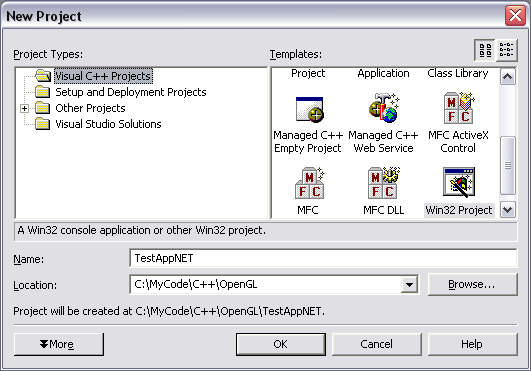
( 2 ) Create a New Win32 Project |
|
On the left side under Project Types click: Visual C++ Projects |
|
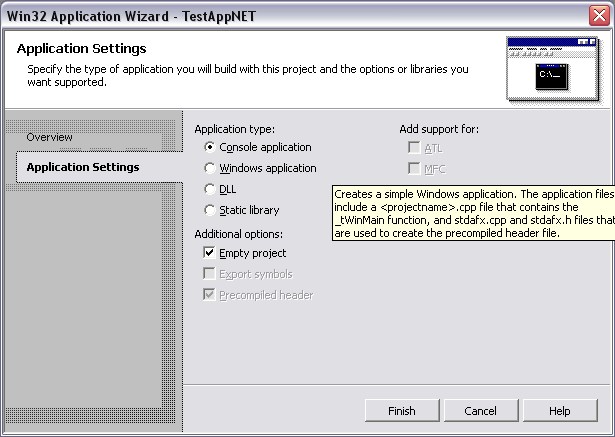
( 3 ) Create a New Console Application |
|
In order to create an empty console application (standard for using OpenGL/GLUT) you
need to click on Application Settings on the left side of the dialog.
|
|
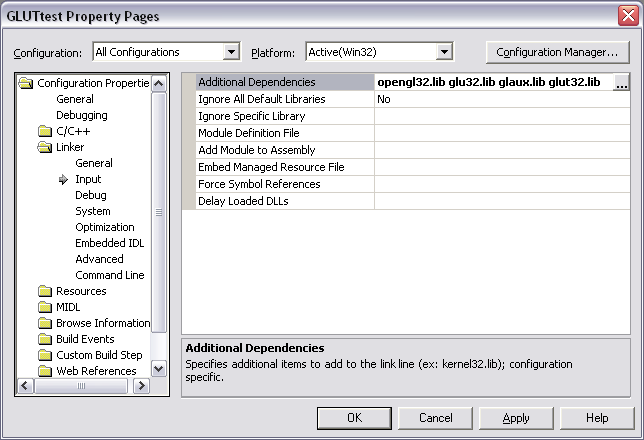
( 4 ) Linking OpenGL and GLUT |
|
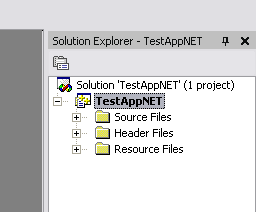
You should now be facing a blank project. Somewhere within Visual Studio should be
the Solution Explorer (It is docked on the right side at the top by default).
Now right click on the project (called TestAppNET here) and click Properties.
|
|
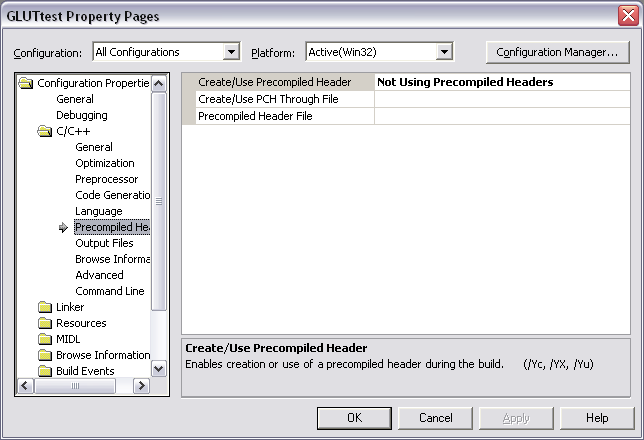
( 5 ) Turning off Precompiled Headers |
|
I'm not sure what this feature is for but it plays havoc with OpenGL and other libraries such as
STL. When you try to compile a number of strange errors occur duing the linking phase. Turning off
precompiled headers solved this problem for me.
|
|
( 6 ) Creating a basic OpenGL/GLUT program |
|
We now need a source code (.c or .cpp) file to put our code into. To do this right click on the
Source Files folder under project in the Solution Explorer. If this is
not visible click the small + to the left of the project name. In the right click menu click
Add -> Add New Item.... A new dialog will open. Click Visual C++
on the left side then click C++ File (.cpp) on the right side.
#include <windows.h>
#include <GL/gl.h>
#include <GL/glut.h>

int a[3]={10,10,10}, b[3]={10,-10,10},
    c[3]={-10,-10,10}, d[3]={-10,10,10},
    e[3]={10,10,-10}, f[3]={10,-10,-10},
    g[3]={-10,-10,-10}, h[3]={-10,10,-10};

float angle=1.0;

void drawcube(void)
{
  glClear(GL_COLOR_BUFFER_BIT);
  glColor3f(1.0, 1.0, 1.0);

  glMatrixMode(GL_MODELVIEW);
  glRotatef(angle, 0.0, 1.0, 0.0);
  glBegin(GL_LINE_LOOP);
    glVertex3iv(a);
    glVertex3iv(b);
    glVertex3iv(c);
    glVertex3iv(d);
  glEnd();
  glBegin(GL_LINE_LOOP);
    glVertex3iv(a);
    glVertex3iv(e);
    glVertex3iv(f);
    glVertex3iv(b);
  glEnd();
  glBegin(GL_LINE_LOOP);
    glVertex3iv(d);
    glVertex3iv(h);
    glVertex3iv(g);
    glVertex3iv(c);
  glEnd();
  glBegin(GL_LINE_LOOP);
    glVertex3iv(e);
    glVertex3iv(f);
    glVertex3iv(g);
    glVertex3iv(h);
  glEnd();

  glFlush();
  glutSwapBuffers();
}

void keyboard(unsigned char key, int x, int y)
{
  switch (key)
  {
    case 0x1B:
    case 'q':
    case 'Q':
      exit(0);
    break;
  }
}

void mouse(int btn, int state, int x, int y)
{
  if (state == GLUT_DOWN)
  {
    if (btn == GLUT_LEFT_BUTTON)
      angle = angle + 1.0f;
    else if (btn == GLUT_RIGHT_BUTTON)
      angle = angle - 1.0f;
    else
      angle = 0.0f;
  }
}

int main(int argc, char **argv)
{
  glutInit(&argc, argv);
  glutInitWindowSize(500, 500);
  glutInitDisplayMode(GLUT_RGB | GLUT_DOUBLE);
  glutCreateWindow("Glut rotate");
  glutMouseFunc(mouse);
  glutKeyboardFunc(keyboard);
  glutDisplayFunc(drawcube);
  glutIdleFunc(drawcube);

  glMatrixMode(GL_PROJECTION);
  glLoadIdentity();
  glOrtho(-30.0, 30.0, -30.0, 30.0, -30.0, 30.0);
  glRotatef(30.0, 1.0, 0.0, 0.0);
  glMatrixMode(GL_MODELVIEW);
  glClearColor(0.0, 0.0, 0.0, 0.0);

  glutMainLoop();
  return(0);
}
Save the file now by clicking File -> Save filename or by
pressing Ctrl + S. Then run it by clicking Debug -> Run
without Debugging or by pressing Ctrl + F5. Visual Studio
should ask you if you want to compile the project so click Yes.
An OpenGL/GLUT window should now appear with a wireframe box rotating. Press the
Q key to quit the program. |
© 2003 -- Adam Hewgill